MySQL import and export commands

MySQL is an open-source relational database management system (RDBMS). World's second most widely used open-source client–server RDBMS. The MySQL development project has made its source code available under the terms of the GNU General Public License and owned by Oracle Corporation.
MySQL import and export commands


Now lets see simple command line examples for exporting and importing MySQL database(s). All examples are shown under Windows machines. So when we try in different OS only path(s) will change rather than commands shown below.


Export Commands:

Open command prompt and goto MySQL installed bin folder as shown below location. NOTE: Installation directory path may change from system to system.

C:\Program Files\MySQL\MySQL Server 5.6\bin>


1. Export all databases

> mysqldump -u{username} -p{password} -h{host} --all-databases > C:\Backup\all-databases.sql

* username - MySQL username
* password - MySQL password
* host - MySQL server host. If MySQL running in local then please mention as 'localhost' else give remote MySQL server IP address. When we give remote server IP, need to make sure that we have access to remote MySQL server.


2. Export single database

> mysqldump -u{username} -p{password} -h{host} {database_name} > C:\Backup\database.sql

* database_name - MySQL database name to export to file.


3. Export more than 1 database

> mysqldump -u{username} -p{password} -h{host} --databases {database_name_1} {database_name_2} > C:\Backup\databases_1_2.sql


4. Export only specific tables from database

> mysqldump -u{username} -p{password} -h{host} {database_name} {table_name_1} {table_name_2} > C:\Backup\database_table_1_2.sql


mysqldump supports the various options, which can be specified on the command. For more informations on options please refer to MySQL site link under Table 4:11


Import Command:

Similar to mysqldump command please goto MySQL installed bin folder [C:\Program Files\MySQL\MySQL Server 5.6\bin>].

1. Import all databases

mysql -u{username} -p{password} -h{host} < C:\Backup\all-databases.sql


2. Import particular database

> mysql -u{username} -p{password} -h{host} {database_name} < C:\Backup\database.sql

* NOTE: Database with name mentioned must exist already, else create empty database with the name mentioned before importing.


3. Import tables into particular database

> mysql -u{username} -p{password} -h{host} {database_name} < C:\Backup\database_table_1_2.sql

* NOTE: Database with name mentioned must exist already, else create empty database with the name mentioned before importing.

Custom Annotation with Example

Annotations are only metadata and they do not contain any business logic. Prior to annotation introduced XML were used for metadata and somehow XML maintenance was getting troublesome. So something we need very loosely coupled from code and then annotations came into picture.
Custom Annotation with Example

Java by default provides built-in annotations like @Override, @Deprecated, @SuppressWarnings, @SafeVarargs and @FunctionalInterface.

  • @Override  - Used when overriding a method from super class. 
  • @Deprecated - Used to indicate a method is deprecated. When we use this annotation recommendedto provide information for why particular method deprecated and alternative solution to use it. 
  • @SuppressWarnings - Used to ignore specific warnings shown in code. 
  • @SafeVarargs - Suppress warnings for all callers of a method or constructor with a generics varargs parameter, since Java 7.
  • @FunctionalInterface - Specifies that the type declaration is intended to be a functional interface, since Java 8.

Now lets see simple example to write custom annotation which is as simple as writing interfaces. Just we need to prefix @ symbol to "interface" keyword. Some of the properties of annotation class must follow are

There a 5 types of meta annotations which gives information about the annotation which we create and they are @Documented, @Target, @Inherited, @Retention and @Repeatable

  • @Retention - Specifies how the marked annotation is stored—Whether in code only, compiled into the class, or available at run-time through reflection. Various Retention policies like
    1. RetentionPolicy.CLASS (Annotations are to be recorded in the class file by the compiler but need not be retained by the VM at run time. This is the default behavior.)
    2. RetentionPolicy.RUNTIME (Annotations are to be recorded in the class file by the compiler and retained by the VM at run time, so they may be read reflectively.)
    3. RetentionPolicy.SOURCE (Annotations are to be discarded by the compiler.)
  • @Documented - Marks another annotation for inclusion in the documentation.
  • @Target - Marks another annotation to restrict what kind of Java elements the annotation may be applied to. Various ElementTypes like 
    1. ElementType.TYPE (class, interface, enum)
    2. ElementType.TYPE_USE (Since 1.8)
    3. ElementType.TYPE_PARAMETER (Since 1.8)
    4. ElementType.FIELD (instance variable)
    5. ElementType.METHOD
    6. ElementType.PARAMETER
    7. ElementType.CONSTRUCTOR
    8. ElementType.LOCAL_VARIABLE
    9. ElementType.ANNOTATION_TYPE (on another annotation)
    10. ElementType.PACKAGE 
  • @Inherited - Marks another annotation to be inherited to subclasses of annotated class (by default annotations are not inherited to subclasses).
  • @Repeatable - Specifies that the annotation can be applied more than once to the same declaration, since Java 8.

Simple annotation example:

MethodInfo.java

import java.lang.annotation.Documented;
import java.lang.annotation.ElementType;
import java.lang.annotation.Inherited;
import java.lang.annotation.Retention;
import java.lang.annotation.RetentionPolicy;
import java.lang.annotation.Target;

@Documented
@Target(ElementType.METHOD)
@Inherited
@Retention(RetentionPolicy.RUNTIME)
public @interface MethodInfo{
    String createdBy() default "Anand";
    String createdDate();
    String comments();
}


AnnotationTest.java

public class AnnotationTest {

 @MethodInfo(createdBy = "Anand", createdDate = "20th Nov 2015", comments = "Just saying Hello :)")
 public void sayHello(String name){
  System.out.println("Hello "+name);
 }
 
 public static void main(String[] args) {

  new AnnotationTest().sayHello("Java Discover");
  
 }
}


Spring + @PropertySource with @Value and Environment

 
In Spring we can configure our application properties in property file and by @PropertySource annotation we can configure externalized configuration file. Those property values can be read by using @Value annotation or by using Environment class.
In below lets see simple example how to use @PropertySource to read property file and to fetch those values using @Value and Environment class. Simple example that we need to serve static resources from different locations to configure in Spring and that too separate location for images and separate for text files etc., Those locations are configured in "myConfig.properties" file.

myConfig.properties

staticresourceloader.imageFileLocation.path:file:C:\\images\\

staticresourceloader.txtFileLocation.path:file:C:\\txtfiles\\


Reading values using @Value annotation

package com.app.staticresourceloader;


import org.springframework.beans.factory.annotation.Value;
import org.springframework.boot.SpringApplication;
import org.springframework.boot.autoconfigure.EnableAutoConfiguration;
import org.springframework.boot.autoconfigure.SpringBootApplication;
import org.springframework.context.annotation.ComponentScan;
import org.springframework.context.annotation.PropertySource;
import org.springframework.web.servlet.config.annotation.ResourceHandlerRegistry;
import org.springframework.web.servlet.config.annotation.WebMvcConfigurerAdapter;

@ComponentScan
@EnableAutoConfiguration
@PropertySource("classpath:myConfig.properties")
@SpringBootApplication
public class Application extends WebMvcConfigurerAdapter  {

 @Value("${staticresourceloader.imageFileLocation.path}")
    private String staticImageFilePath;
 
 @Value("${staticresourceloader.txtFileLocation.path}")
    private String staticTxtFilePath;
 
 public static void main(String[] args) {
        SpringApplication.run(Application.class, args);
        
    }
    
 @Override
    public void addResourceHandlers(ResourceHandlerRegistry registry) {
        
  System.out.println("IMAGE FILE PATH :::: "+staticImageFilePath);
  System.out.println("TEXT FILE PATH  :::: "+staticTxtFilePath);
  
  registry.addResourceHandler("/api/image/**").addResourceLocations(staticImageFilePath);
        registry.addResourceHandler("/api/txt/**").addResourceLocations(staticTxtFilePath);
        
    }   
}


Reading values using Environment

package com.app.staticresourceloader;

import org.springframework.beans.factory.annotation.Autowired;
import org.springframework.boot.SpringApplication;
import org.springframework.boot.autoconfigure.EnableAutoConfiguration;
import org.springframework.boot.autoconfigure.SpringBootApplication;
import org.springframework.context.annotation.ComponentScan;
import org.springframework.context.annotation.PropertySource;
import org.springframework.core.env.Environment;
import org.springframework.web.servlet.config.annotation.ResourceHandlerRegistry;
import org.springframework.web.servlet.config.annotation.WebMvcConfigurerAdapter;

@ComponentScan
@EnableAutoConfiguration
@PropertySource("classpath:myConfig.properties")
@SpringBootApplication
public class Application extends WebMvcConfigurerAdapter  {

 @Autowired
 private Environment pathDetails;
 
 public static void main(String[] args) {
        SpringApplication.run(Application.class, args);
        
    }
    
 @Override
    public void addResourceHandlers(ResourceHandlerRegistry registry) {
  
  String imagePath = pathDetails.getProperty("staticresourceloader.imageFileLocation.path");
  String txtPath = pathDetails.getProperty("staticresourceloader.txtFileLocation.path");
  
  System.out.println("IMAGE FILE PATH :::: "+imagePath);
  System.out.println("TEXT FILE PATH  :::: "+txtPath);
  
  registry.addResourceHandler("/api/image/**").addResourceLocations(imagePath);
        registry.addResourceHandler("/api/txt/**").addResourceLocations(txtPath);
        
    }   
}


OUTPUT:

Spring + @PropertySource with @Value and Environment

Spring Boot + Spring Security + Serve static resources from different locations

In Spring we can configure static resources such as  images, js, and, css files from specific locations under web application root, the classpath, and other locations. Even we can configure multiple locations to server different type of file.
An implementation of WebMvcConfigurer interface in WebMvcConfigurerAdapter abstract class with empty methods allowing sub-classes to override only the methods they're interested in. To achieve and serve static resources from different locations we need to extend WebMvcConfigurerAdapter class and need to @Override addResourceHandlers() method in our Application class.
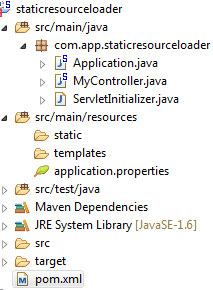
Lets simple example to serve static resources like images and text files from different locations.
Here in this example we are loading images and text files from different locations like

  • images from C://images 
  • text files from C://txtfiles

pom.xml

<?xml version="1.0" encoding="UTF-8"?>
<project xmlns="http://maven.apache.org/POM/4.0.0" xmlns:xsi="http://www.w3.org/2001/XMLSchema-instance"
 xsi:schemaLocation="http://maven.apache.org/POM/4.0.0 http://maven.apache.org/xsd/maven-4.0.0.xsd">
 <modelVersion>4.0.0</modelVersion>

 <groupId>com.app</groupId>
 <artifactId>staticresourceloader</artifactId>
 <version>0.0.1-SNAPSHOT</version>
 <packaging>war</packaging>

 <name>staticresourceloader</name>
 <description>staticresourceloader project</description>

 <parent>
  <groupId>org.springframework.boot</groupId>
  <artifactId>spring-boot-starter-parent</artifactId>
  <version>1.2.5.RELEASE</version>
  <relativePath/> <!-- lookup parent from repository -->
 </parent>

  <dependencies>
  
  <dependency>
   <groupId>org.springframework.boot</groupId>
   <artifactId>spring-boot-starter-security</artifactId>
  </dependency>
  <dependency>
   <groupId>org.springframework.boot</groupId>
   <artifactId>spring-boot-starter-web</artifactId>
  </dependency>
  <dependency>
   <groupId>org.springframework.boot</groupId>
   <artifactId>spring-boot-starter-ws</artifactId>
  </dependency>
  
  <dependency>
   <groupId>org.springframework.boot</groupId>
   <artifactId>spring-boot-starter-tomcat</artifactId>
   <scope>provided</scope>
  </dependency>
  <dependency>
   <groupId>org.springframework.boot</groupId>
   <artifactId>spring-boot-starter-test</artifactId>
   <scope>test</scope>
  </dependency>
 </dependencies>
 
 <build>
  <plugins>
   <plugin>
    <groupId>org.springframework.boot</groupId>
    <artifactId>spring-boot-maven-plugin</artifactId>
   </plugin>
  </plugins>
 </build>

</project>


application.properties

security.user.password=Efhj34tGVW

staticresourceloader.imageFileLocation.path:file:C:\\images\\

staticresourceloader.txtFileLocation.path:file:C:\\txtfiles\\


Application.java

package com.app.staticresourceloader;

import org.springframework.beans.factory.annotation.Value;
import org.springframework.boot.SpringApplication;
import org.springframework.boot.autoconfigure.EnableAutoConfiguration;
import org.springframework.boot.autoconfigure.SpringBootApplication;
import org.springframework.context.annotation.ComponentScan;
import org.springframework.web.servlet.config.annotation.ResourceHandlerRegistry;
import org.springframework.web.servlet.config.annotation.WebMvcConfigurerAdapter;

@ComponentScan
@EnableAutoConfiguration
@SpringBootApplication
public class Application extends WebMvcConfigurerAdapter  {

 @Value("${staticresourceloader.imageFileLocation.path}")
    private String staticImageFilePath;
 
 @Value("${staticresourceloader.txtFileLocation.path}")
    private String staticTxtFilePath;
 
 public static void main(String[] args) {
        SpringApplication.run(Application.class, args);
    }
    
 @Override
    public void addResourceHandlers(ResourceHandlerRegistry registry) {
        registry.addResourceHandler("/api/image/**").addResourceLocations(staticImageFilePath);
        registry.addResourceHandler("/api/txt/**").addResourceLocations(staticTxtFilePath);
    }    
}


ServletInitializer.java

package com.app.staticresourceloader;

import org.springframework.boot.builder.SpringApplicationBuilder;
import org.springframework.boot.context.web.SpringBootServletInitializer;

public class ServletInitializer extends SpringBootServletInitializer {

 @Override
 protected SpringApplicationBuilder configure(SpringApplicationBuilder application) {
  return application.sources(Application.class);
 } 
}


MyController.java

package com.app.staticresourceloader;

import java.io.File;
import java.util.ArrayList;
import java.util.Collection;

import org.springframework.beans.factory.annotation.Value;
import org.springframework.http.HttpStatus;
import org.springframework.http.ResponseEntity;
import org.springframework.stereotype.Controller;
import org.springframework.web.bind.annotation.RequestMapping;
import org.springframework.web.bind.annotation.RequestMethod;


@Controller
public class MyController {

 @Value("${staticresourceloader.imageFileLocation.path}")
    private String staticImageFilePath;
 
 @Value("${staticresourceloader.txtFileLocation.path}")
    private String staticTxtFilePath;
 
 
 @RequestMapping(value="/api/getImageList", method=RequestMethod.GET, headers="Accept=application/json")
 public ResponseEntity<Collection<String>> getImageList(){
  
  Collection<String> fileList = fileList(staticImageFilePath, "image");
  
  return new ResponseEntity<Collection<String>>(fileList, HttpStatus.OK);
 } 


        @RequestMapping(value="/api/getTxtList", method=RequestMethod.GET, headers="Accept=application/json")
 public ResponseEntity<Collection<String>> getTxtFileList(){
  
  Collection<String> fileList = fileList(staticTxtFilePath, "txt");
  
  return new ResponseEntity<Collection<String>>(fileList, HttpStatus.OK);
 } 


        public Collection<String> fileList(String folderPath, String type) {
  
  File directory = new File(folderPath.replace("file:", ""));
  File[] fList = directory.listFiles();
  
  Collection<String> list = new ArrayList<String>();
  
  for (File file : fList) {
   
   list.add("http://localhost:8080/api/"+type+"/"+file.getName());
  }  
  return list;
 } 
}

Spring Boot + Spring Security + Serve static resources from different locations


OUTPUT:

Spring Boot + Spring Security + Serve static resources from different locations

Spring Boot + Spring Security + Serve static resources from different locations

Spring Boot + Spring Security + Serve static resources from different locations

Spring Boot + Spring Security + Serve static resources from different locations

Spring Boot + Spring Security + Serve static resources from different locations


Spring Resource Loader with example

Spring Resource Loader is very generic and easy to load resources directly as file, url or classpath and of any file types like text, media or image. By using getResource() we can implement single generic method for any file type. By implementing ResourceLoaderAware interface we can inject ResourceLoader object into the bean, since ResourceLoader is non-accessable from application context.

ResourceBeanConfig.xml


<beans xmlns="http://www.springframework.org/schema/beans"
xmlns:xsi="http://www.w3.org/2001/XMLSchema-instance"
xsi:schemaLocation="http://www.springframework.org/schema/beans
http://www.springframework.org/schema/beans/spring-beans-3.0.xsd">

   <bean id="resource" class="com.app.javadiscover.ResourceBean" />
   
</beans>


ResourceBean.java


package com.app.javadiscover;

import org.springframework.context.ResourceLoaderAware;
import org.springframework.core.io.Resource;
import org.springframework.core.io.ResourceLoader;

public class ResourceBean implements ResourceLoaderAware {
 private ResourceLoader resourceLoader;
 
 public void setResourceLoader(ResourceLoader resourceLoader) {
  this.resourceLoader = resourceLoader;
 }
  
 public Resource getResource(String location){
  return resourceLoader.getResource(location);
 }
}


LoadResource.java


package com.app.javadiscover;

import java.io.BufferedReader;
import java.io.IOException;
import java.io.InputStream;
import java.io.InputStreamReader;

import org.springframework.context.ApplicationContext;
import org.springframework.context.support.ClassPathXmlApplicationContext;
import org.springframework.core.io.Resource;


public class LoadResource  {

 public static void main( String[] args )
    {
     ApplicationContext appContext =  new ClassPathXmlApplicationContext("ResourceBeanConfig.xml");

     Resource resource = appContext.getResource("classpath:ResourceBeanConfig.xml");
     
    try{
        InputStream iStream = resource.getInputStream();
          BufferedReader bReader = new BufferedReader(new InputStreamReader(iStream));
         
          String text;
          
          while ((text = bReader.readLine()) != null) {
             System.out.println(text);
          } 
          bReader.close();
         
     }catch(IOException e){
      e.printStackTrace();
     }
     
    }
}


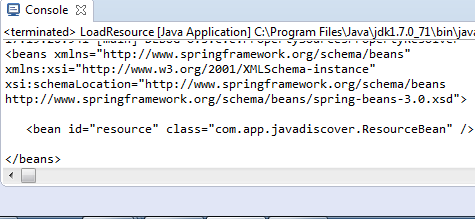
OUTPUT:

Spring Resource Loader with example


In above example we have used classpath to load xml file and to print line by line. Similar way we can use file and url resource loader as like below.


     Resource resource = appContext.getResource("file:C:\\javadiscover.xml");


     Resource resource = appContext.getResource("url:http://textfiles.com");


Sending email using embedded Image in Java

In our earlier tutorial we have how to send email using Java Code. As same way in this tutorial lets see how to send email using embedded image. By using javax.mail API we can achieve this by creating 2 MimeBodyPart instance for attaching image and to add HTML body text. In this below example lets see step by step to set SMTP server details and to message body with embedded image.


import java.io.IOException;
import java.util.Properties;
import javax.mail.Authenticator;
import javax.mail.Message;
import javax.mail.MessagingException;
import javax.mail.Multipart;
import javax.mail.PasswordAuthentication;
import javax.mail.Session;
import javax.mail.Transport;
import javax.mail.internet.InternetAddress;
import javax.mail.internet.MimeBodyPart;
import javax.mail.internet.MimeMessage;
import javax.mail.internet.MimeMultipart;


public class SendMail {

 public void emailWithEmbeddedImage() {

  try {

   final String from = "sender@gmail.com";
   final String password = "senderpassword";
   
   String toAddress = "to@gmail.com";
   String ccAddress ="cc@gmail.com";
   String bccAddress = "bcc@gmail.com";
   String name = "Job";
   
   // JavaMail session object
   Session session;

   // The JavaMail message object
   Message mesg;

   //SMTP server properties 
   Properties properties = new Properties();
   properties.put("mail.smtp.host", "smtp.gmail.com");
   properties.put("mail.smtp.port", 587);
   properties.put("mail.smtp.auth", "true");
   properties.put("mail.smtp.starttls.enable", "true");

   // authenticate sender username and password 
   Authenticator auth = new Authenticator() {
    public PasswordAuthentication getPasswordAuthentication() {
     return new PasswordAuthentication(from, password);
    }
   };

   // initialize session object
   session = Session.getInstance(properties, auth);
   session.setDebug(false);

   // initialize message object
   mesg = new MimeMessage(session);

   // from Address
   mesg.setFrom(new InternetAddress(from));

   // Email Addresses
   InternetAddress toAdd = new InternetAddress(toAddress);
   InternetAddress ccAdd = new InternetAddress(ccAddress);
   InternetAddress bccAdd = new InternetAddress(bccAddress);

   mesg.addRecipient(Message.RecipientType.TO, toAdd);
   mesg.addRecipient(Message.RecipientType.CC, ccAdd);
   mesg.addRecipient(Message.RecipientType.BCC, bccAdd);

   // email Subject
   mesg.setSubject("Visitor Pass");

   // message body.
   Multipart mp = new MimeMultipart("related");

   String cid = "qr";

   MimeBodyPart pixPart = new MimeBodyPart();
   pixPart.attachFile("C:\\image.png");
   pixPart.setContentID("<" + cid + ">");
   pixPart.setDisposition(MimeBodyPart.INLINE);

   MimeBodyPart textPart = new MimeBodyPart();
   textPart.setText("<html>" + "Hello " + name + ", <br> "
     + "Please find your visiting QR code <br> "
     + "<div><img src=\"cid:" + cid
     + "\" /></div></html>" + "Thanks & Regards, <br> "
     + "Bill</html>", "US-ASCII", "html");

   // Attach text and image to message body
   mp.addBodyPart(textPart);
   mp.addBodyPart(pixPart);

   // Setting message content
   mesg.setContent(mp);

   // Send mail
   Transport.send(mesg);

  } catch (MessagingException e) {
   System.err.println(e);
   e.printStackTrace(System.err);
  } catch (IOException e) {
   System.err.println(e);
   e.printStackTrace();
  }
 }
 
 public static void main(String[] args) {
  
  new SendMail().emailWithEmbeddedImage();
  
 }
}

OUTPUT:

Sending Email using embedded Image in Java

Here QR code image embedded with email and shown sample screen shot as output. 

Generate QR Code using Java

 
QR code (Quick Response Code) is the trademark for a type of matrix bar-code, first designed for the automotive industry in Japan. A QR code consists of black modules (square dots) arranged in a square grid on a white background, which can be read by an imaging device (such as a camera, scanner, etc.) and processed using Reed–Solomon error correction until the image can be appropriately interpreted. The required data are then extracted from patterns that are present in both horizontal and vertical components of the image.
Now lets see simple Java Code to generate QR code by using qrgen API

GenerateQRCode.java


import java.io.ByteArrayOutputStream;
import java.io.File;
import java.io.FileNotFoundException;
import java.io.FileOutputStream;
import java.io.IOException;

import net.glxn.qrgen.QRCode;
import net.glxn.qrgen.image.ImageType;

public class GenerateQRCode {

 public static void main(String[] args) {
  new GenerateQRCode().generateQRImage("sdfhjkjhrf23khsdfkh#@Wersdfcsdfsdf24r4sdf");
 }

 
 public void generateQRImage(String qrCode){
  
  try {
   
   ByteArrayOutputStream out = QRCode.from(qrCode).withSize(250, 250).to(ImageType.PNG).stream();

   FileOutputStream fout = new FileOutputStream(new File("C://"+qrCode+".png"));
            
            fout.write(out.toByteArray());
 
            fout.flush();
            fout.close();
            
            
        } catch (FileNotFoundException e) {
            e.printStackTrace();
        } catch (IOException e) {
            e.printStackTrace();
        }
  
 }
}


OUTPUT:

Generate QR Code using Java