Spring Resource Loader with example
Spring Resource Loader is very generic and easy to load resources directly as file, url or classpath and of any file types like text, media or image. By using getResource() we can implement single generic method for any file type. By implementing ResourceLoaderAware interface we can inject ResourceLoader object into the bean, since ResourceLoader is non-accessable from application context.
ResourceBeanConfig.xml
ResourceBean.java
LoadResource.java
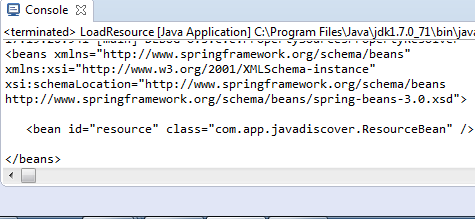
OUTPUT:
In above example we have used classpath to load xml file and to print line by line. Similar way we can use file and url resource loader as like below.
Resource resource = appContext.getResource("file:C:\\javadiscover.xml");
ResourceBeanConfig.xml
<beans xmlns="http://www.springframework.org/schema/beans"
xmlns:xsi="http://www.w3.org/2001/XMLSchema-instance"
xsi:schemaLocation="http://www.springframework.org/schema/beans
http://www.springframework.org/schema/beans/spring-beans-3.0.xsd">

   <bean id="resource" class="com.app.javadiscover.ResourceBean" />

</beans>
ResourceBean.java
package com.app.javadiscover;

import org.springframework.context.ResourceLoaderAware;
import org.springframework.core.io.Resource;
import org.springframework.core.io.ResourceLoader;

public class ResourceBean implements ResourceLoaderAware {
 private ResourceLoader resourceLoader;

 public void setResourceLoader(ResourceLoader resourceLoader) {
  this.resourceLoader = resourceLoader;
 }

 public Resource getResource(String location){
  return resourceLoader.getResource(location);
 }
}
LoadResource.java
package com.app.javadiscover;

import java.io.BufferedReader;
import java.io.IOException;
import java.io.InputStream;
import java.io.InputStreamReader;

import org.springframework.context.ApplicationContext;
import org.springframework.context.support.ClassPathXmlApplicationContext;
import org.springframework.core.io.Resource;


public class LoadResource  {

 public static void main( String[] args )
    {
     ApplicationContext appContext =  new ClassPathXmlApplicationContext("ResourceBeanConfig.xml");

     Resource resource = appContext.getResource("classpath:ResourceBeanConfig.xml");

    try{
        InputStream iStream = resource.getInputStream();
          BufferedReader bReader = new BufferedReader(new InputStreamReader(iStream));

          String text;

          while ((text = bReader.readLine()) != null) {
             System.out.println(text);
          }
          bReader.close();

     }catch(IOException e){
      e.printStackTrace();
     }

    }
}
OUTPUT:
In above example we have used classpath to load xml file and to print line by line. Similar way we can use file and url resource loader as like below.
Resource resource = appContext.getResource("file:C:\\javadiscover.xml");
Resource resource = appContext.getResource("url:http://textfiles.com");